Table of Contents
Bernd Skorupinski is a professional trader and trading coach widely recognized for his refined approach to supply and demand trading, emphasizing precision, discipline, and clean price action. With years of experience navigating the forex and financial markets, Bernd has built a strong reputation among retail and professional traders for his structured methodology that strips away unnecessary indicators and focuses on the raw movements of price.
His trading style is deeply rooted in identifying institutional footprints—particularly through untested and untouched zones of supply and demand, which he categorizes into Preferred Fresh Zones and Wider Fresh Zones. These zones help traders pinpoint high-probability entry points with strong risk-to-reward potential.


Unlike many who rely on traditional technical analysis cluttered with moving averages and oscillators, Bernd teaches traders how to read the story of price through candle structure, market imbalance, and volume dynamics. His training often revolves around understanding the psychology behind price levels and spotting the moments when large institutions are likely to step in.


Bernd is also known for sharing his insights through structured educational content, webinars, and private coaching, helping traders worldwide develop consistency through smart zone-based trading.
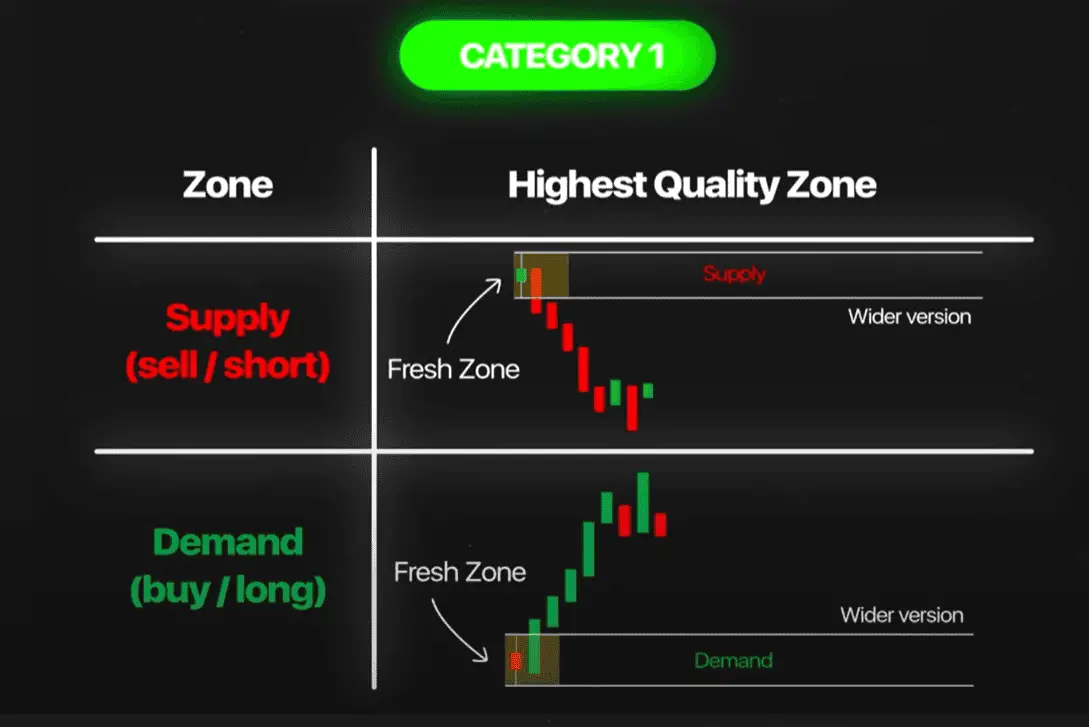
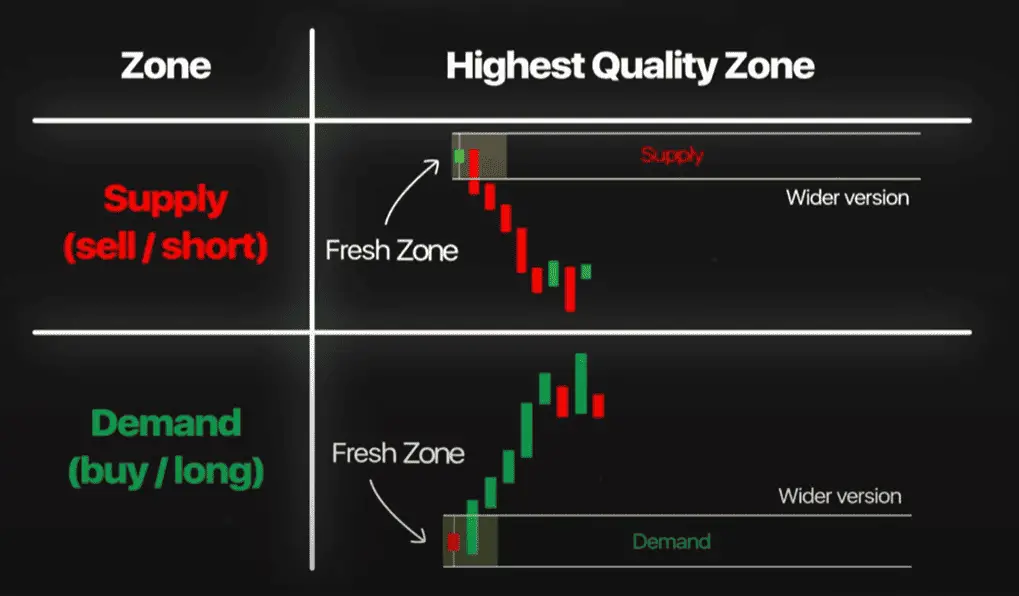
Bernd Skorupinski, known for his price action-based trading concepts, frequently refers to “Preferred Fresh Zones” and “Wider Fresh Zones” when defining high-probability supply and demand areas. These terms are commonly used in the context of supply & demand trading and are designed to help traders determine the most relevant price zones for entries and exits.
Here’s a detailed breakdown of how they are defined and measured:
1. Preferred Fresh Zone (PFZ)
Definition:
A Preferred Fresh Zone is a clean, untested supply or demand zone with a tight price range and clear, impulsive departure. It is the optimal entry area, offering the best risk-reward ratio.

How it is measured:
-
The zone is drawn from the origin of the base candle to the wick of the extreme candle that caused the impulsive move (drop or rally).
-
The base candle is usually a small-bodied candle (indecision) before the strong move away.
-
The extreme candle is the last candle before the impulsive movement (often a strong engulfing candle).
-
The PFZ is usually very narrow, often covering 2-10 pips (depending on the timeframe and asset).
-
“Fresh” means it has not been touched or retested after the original move.
Example: On a 1-hour chart, if a small base candle forms at 1.1000 and a big bullish candle starts from 1.0995 and goes to 1.1050, the PFZ might be drawn from 1.0995 to 1.1000.
2. Wider Fresh Zone (WFZ)
Definition:
A Wider Fresh Zone includes the entire price range where the accumulation or distribution happened before the impulsive move. It’s a broader area that encompasses both the preferred entry and additional price structure leading up to the move.
How it is measured:
-
The zone is drawn from the lowest wick to the highest wick of the entire consolidation or base area before the move.
-
It includes all candles in the base formation—not just the smallest or the most recent one.
-
The WFZ is wider, often used as a secondary or backup entry if the price doesn’t react at the PFZ.
-
Still must be “fresh” (i.e., untouched after the move).
Example: In the same move, if the base formation ranges from 1.0980 to 1.1005, the WFZ would be from 1.0980 to 1.1005.
Key Differences:
| Feature | Preferred Fresh Zone (PFZ) | Wider Fresh Zone (WFZ) |
|---|---|---|
| Size | Narrow | Wider |
| Risk-Reward | Better | Slightly reduced |
| Entry Precision | High | Lower |
| Reaction Probability | Higher | Lower than PFZ but still valid |
| Freshness Required | Yes | Yes |
And now strategy:
Bernd Skorupinski’s Supply & Demand strategy is a refined institutional trading method focused on identifying areas on the chart where large buy or sell orders previously moved the market aggressively. His approach is not just about drawing zones, but understanding the order flow behind those zones—particularly untouched (fresh) institutional footprints that suggest pending buy or sell orders may still exist.
Here is a full detailed explanation of how buy and sell orders are understood and executed in Bernd’s Supply & Demand strategy:
1. Concept of Buy & Sell Orders in Supply & Demand Zones
-
Supply Zone (Sell Orders):
A supply zone is a price area where institutional sell orders previously overwhelmed buyers, resulting in an aggressive move down. The assumption is that not all sell orders were filled at that price, so if price returns, sellers may once again take control. -
Demand Zone (Buy Orders):
A demand zone is a price area where buy orders outpaced sell orders, causing an impulsive move upward. When price returns to this zone, it’s believed there may still be unfilled institutional buy orders that can push price up again.
2. How Buy/Sell Zones Are Created and Traded
A. Formation Criteria
Bernd looks for zones that meet the following criteria:
-
Clear base of consolidation (tight candle formation)
-
Strong impulsive departure (engulfing candle or a momentum move)
-
Freshness: the zone has not been revisited after departure
-
No significant wicks inside the base (shows order imbalance)
-
Tight range of candles (2–4 candles max)
B. Zone Types
-
Preferred Fresh Zone (PFZ):
The tightest part of the base before the impulse move – high-probability entry. -
Wider Fresh Zone (WFZ):
Encompasses the full range of the base – backup area if price pushes deeper.
3. Placing Buy Orders at Demand Zones
Step-by-step:
-
Identify the zone: Look for a strong bullish move that originated from a small base.
-
Draw the demand zone:
-
PFZ: From the lowest body of the last base candle to the low of the wick before the bullish move.
-
WFZ: From the lowest wick to the highest wick of the base formation.
-
-
Set Buy Limit Order: Inside the PFZ or WFZ (whichever is part of your trade plan).
-
Stop Loss: Just below the low of the zone (a few pips for spread protection).
-
Take Profit: Often based on nearest supply zone or RR target (1:3 or higher preferred).
-
Confirmation (optional): On lower timeframe, wait for price rejection or engulfing candle to confirm buyer presence.
4. Placing Sell Orders at Supply Zones
Step-by-step:
-
Identify the zone: Look for a strong bearish move that came from a tight range base.
-
Draw the supply zone:
-
PFZ: From the highest body of the last base candle to the high of the wick before the drop.
-
WFZ: From the highest wick to the lowest wick in the base.
-
-
Set Sell Limit Order: Inside PFZ or WFZ.
-
Stop Loss: Just above the high of the zone.
-
Take Profit: Target nearest demand zone or set RR (typically 1:3 or more).
-
Confirmation (optional): Look for bearish rejection or engulfing on smaller timeframe.
5. Order Types Used
-
Limit Orders (Buy Limit/Sell Limit):
These are the primary tools in Bernd’s strategy. No chasing price; wait for the market to return to the zone. -
Market Orders (optional):
Sometimes used after confirmation on smaller timeframes (e.g., M5/M15), such as engulfing candles or pin bars.
6. Additional Filters to Improve Accuracy
-
Freshness: Price must not have touched the zone since creation.
-
Time of Day: Best zones are respected during high-volume sessions (London/New York).
-
Confluence: Zones that align with higher timeframe S&D, round numbers, or trendlines are stronger.
-
Engulfing Candles: Zones formed after engulfing structures tend to indicate higher institutional involvement.
7. Example of a Buy Trade (Demand Zone)
-
On H1, a strong bullish candle breaks away from a small base.
-
PFZ drawn: 1.2000 to 1.2005
-
WFZ drawn: 1.1992 to 1.2005
-
Buy Limit set at 1.2002 (inside PFZ)
-
Stop loss at 1.1990
-
Take profit at 1.2090 (next major supply zone)
8. Common Mistakes Avoided in Bernd’s Method
-
Trading touched zones (they’re no longer fresh)
-
Overtrading too many zones – only pick quality setups
-
Ignoring market structure – direction matters
-
Setting too tight stop losses – always allow room below/above the zone

He is an expert in financial niche, long-term trading, and weekly technical levels.
The primary field of Igor's research is the application of machine learning in algorithmic trading.
Education: Computer Engineering and Ph.D. in machine learning.
Igor regularly publishes trading-related videos on the Fxigor Youtube channel.
To contact Igor write on:
igor@forex.in.rs
